Introduction
This is the documentation for Ferrum’s developer APIs, as well as some internal functionality. It contains information and recommendations around using Ferrum as a developer. It can also apply as documentation for other similar products with compatible APIs.
Ferrum consists of two APIs: the Legacy API, and the Software API. The Software API is powered by the Ferrum App/Software on the user’s input pc. Currently, Linux users are limited to only using the Legacy API, as the Software API is only compatible with Microsoft Windows.
Key Terms
This section defines some frequently used key terms.
TODO: Attach image of Ferrum board with labelled ports.
Output PC- The PC connected to the Output USB-C port on Ferrum. Commonly referred to as the Main PC or Game PC.Input PC- The PC connected to the Input USB-C port on Ferrum. Commonly referred to as the Second PC or 2pc.Software Provider- The provider of the software that interfaces Ferrum’s APIs to control the peripherals.
Using a Serial Port
In this book, examples are given in terms of serial console input and output. Each line in the example implicitly has a Line Terminator proceeding it, except for the Input Prompt (“>>> “) line, as defined in Command Echoing.
TODO: This section should explain how to connect to a serial port, write to it, and read from it.
Line Terminator
Valid line terminators include any combination of the characters \r and \n. We recommend using either \n or
\r\n, as they are standardized in other specifications.
Command Echoing
For maximum compatibility with software expecting a Python interface, the Ferrum serial interface implements command echoing, as well as an input prompt.
This does not apply to the Legacy API. No command echoing occurs when directly connecting with the Ferrum board.
This means that when a command is sent to Ferrum, it will repeat the command back, followed by the \r\n
line terminator, then send the result of the command, and then send the input prompt (>>> ).
Note that the input prompt is exactly three right facing arrows, followed by a single space, and no line terminator.
Examples
Note these examples use raw data, meaning \r is not a backslash and an r, but instead the carriage return character.
If you don’t understand what this means, try asking ChatGPT, or Googling it.
Using \r\n
Input:
km.left()\r\n
Output:
km.left()\r\n
1\r\n
>>>           # Note this line is `>>> ` with a single space.
Using \n
Input:
km.left()\n
Output:
km.left()\r\n # Even though \n was sent, \r\n is echoed back
1\r\n
>>>           # Note this line is `>>> ` with a single space.
A Command with No Response
Input:
km.left(1)\r
Output:
km.left(1)\r\n
>>>           # Note this line is `>>> ` with a single space.
The Hardware Override
On top of the device control logic (which is what apis like the KM API use to control the mouse), there is a hardware override layer, which is designed to allow the user to take control of their mouse in the event that their software provider incorrectly uses the API.
For example, if the software provider sends km.left(1), and mistakenly never sends km.left(0), the user likely
wouldn’t want their mouse to be stuck down forever. This is where the Hardware Override steps in.
The Hardware Override is a simple state machine, defining when the software input is to be ignored in favor of the hardware input. How it behaves can be seen in the image below.
TODO: Update image to match behavior with timed forced releases.
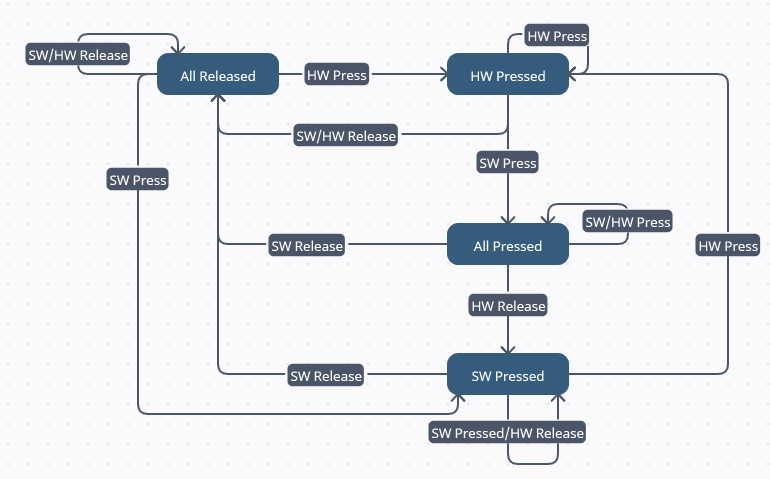
In this image, HW Press/Release means the physical button on the mouse was pressed/released, and SW Press/Release means
the software sent a down/up request (ex: km.left(0) or km.left(1)).
This image may seem daunting at first, but it can make sense by breaking it down into small steps. Such as by starting
at All Released, and seeing where it goes when you press a button, or send a command. It should hopefully quickly
make sense how the override works, and how a user can press or release a button to override a software input.
Software API
The Software API is the more modern, high-performance, and advanced API available on Ferrum. It supports not only KM style commands (over a serial port), but also KMBox Net style commands (over a UDP Socket), DHZBox style commands (over a UDP socket), as well as a variety of custom commands.
The following sections provide information and pseudocode examples for the different commands available.
Keyboard and Mouse API
The Keyboard and Mouse API, aka KM API, is a simple set of commands used to control much of Ferrum’s functionality. It allows software to press and release mouse buttons or keyboard keys. Software can also use it to block keys from being sent to the output computer, or to read the state of a physical button or key on a peripheral.
The following sections provide information and pseudocode examples for the different commands available.
Misc
This contains all miscellaneous command definitions.
Version
The km.version() command can be used to retrieve the device version. This is a more universal command used to
determine hardware being used, such as MAKCU vs Ferrum.
When connected to the Ferrum App, and thus using the Keyboard Mouse API, this command returns “kmbox: Ferrum”, formatted as such for compatibility with legacy software.
Examples
Fetching the Device Version
Input:
km.version()
Output:
km.version()
kmbox: Ferrum
>>>
Mouse
This section covers all km commands that affect devices designated as Mice. A device’s type (Mouse or Keyboard) can be set in the Ferrum Utility on the input computer.
Buttons
There are 5 buttons on any mouse being used on Microsoft Windows.
| Button Name | Button Description |
|---|---|
| left | the left button |
| right | the right button |
| middle | the scroll wheel button |
| side1 | the rear side button |
| side2 | the front side button |
Set Button State
The km.[button_name]([state]) command is used to set the state of any of the mouse buttons.
By replacing button_name with the name of any button, as defined in the Buttons section, this command
can be used for all buttons.
By replacing state with either 1 for pressed, or 0 for releasing a press, the command can be used to force a
button down, or release the force press.
Releases last for a uniformly random time period between 125ms and 175ms. After this time period, the button returns to the physical state.
Presses are indefinite, meaning until the user engages the Hardware Override, or a release or click command is sent, the button will remain pressed.
Note: The click command will override any presses or releases in place.
Examples
Pressing the Left Button
Input:
km.left(1) # 1 for pressing the button
Output:
km.left(1)
>>>
Pressing and Releasing the Front Side Button
Input:
km.side2(1)    # 1 for pressing the button
# A slight delay of is recommended here so the click appears realistic.
km.side2(0)    # 0 for releasing the button
Output:
km.side2(1)
>>> km.side2(0)
>>>
Click
The km.click([button]) command is used to make the mouse press and release a button over some time.
By replacing button with the number representing a button as shown below, this command can be used for all buttons.
Currently this command presses, delays, releases, delays, and then returns to the hardware state.
There is a delay for how long the press and release are held for. The press and release durations are uniformly random values between 75ms and 125ms, and 125ms and 175ms respectively. For fine control over the duration of the delays, I strongly recommend developers use the commands defined in Set Button State.
Clicks can be overridden by the user via the Hardware Override.
If the button is physically pressed when the click starts, it will be force released after the press delay, and then the release will be removed after the release delay, putting it back in the hardware state (pressed if it’s still physically pressed, or released if the user released the button at some point).
| Button Number | Button Description |
|---|---|
| 0 | the left button |
| 1 | the right button |
| 2 | the scroll wheel button |
| 3 | the rear side button |
| 4 | the front side button |
Examples
Clicking the Left Button
Input:
km.click(0) # 0 for Left
Output:
km.click(0)
>>>
Clicking the Front Side Button
Input:
km.click(4) # 4 for Front Side
Output:
km.click(4)
>>>
Lock
The km.lock_[button_lock_name] command is used to read and write the state of the lock on any mouse button.
By replacing button_lock_name with one of the button lock names defined below, it can be made to work with any button.
Calling the command with no arguments (by using ()) will return the state of the lock on the button.
Calling the command with one argument will set the lock’s state. If the argument is 1 it will enable it. If it is 0,
it will disable it.
When the lock is enabled, any physical button presses will not be sent to the Output PC. The Input PC can still read the button states via either the Get Button State or Button State Event commands. The Input PC can also still press/release the button via either the Click or Press/Release commands.
This is also known as “input masking”, as the physical input is “masked” from the Output PC.
| Button Lock Name | Button Description |
|---|---|
| ml | the left button |
| mr | the right button |
| mm | the scroll wheel button |
| ms1 | the rear side button |
| ms2 | the front side button |
Examples
Locking the Left Mouse Button
Input:
km.lock_ml(1) # Since the value is 1, the lock is now on.
Output:
km.lock_ml(1)
>>>
Locking, Reading, Unlocking, and Reading the Front Side Mouse Button
Input:
km.lock_ms2(1)   # The side button will no longer function on the Output PC.
km.lock_ms2()
km.lock_ms2(0)   # The side button will now work again on the Output PC.
km.lock_ms2()
Output:
km.lock_ms2(1)
>>> km.lock_ms2()
1                  # Since the lock is enabled, this outputs 1.
>>> km.lock_ms2(0)
>>> km.lock_ms2()
0                  # Since the lock is disabled, this outputs 0.
>>>
Get Button State
The km.[button_name]() command is used to read the state of any of the mouse buttons.
By replacing button_name with the name of any button, as defined in the Buttons section, this command
can be used for all buttons.
Examples
Reading the Left Button’s State
Input:
km.left()
Output:
km.left()
1            # The Left Button in this case was pressed (1).
>>>
Reading the Front Side Button’s State
Input:
km.side2()
Output:
km.side2()
0            # The Front Side Button in this case was released (0).
>>>
Button State Change Callback
Prefix
The syntax for this function was designed by “I hack”, the developer of MAKCU. It is implemented here for compatibility’s sake. However, it is a rather complex function, and may be difficult to grasp at first. If you want something simple instead, its functionality can be substituted by using the Get Button State command.
As an aside, for those that do read and implement usage of this command, be sure your string parsing of the output of
the Callback accounts for the \0 character. This is known as the null character, and is typically used for marking the
end of a string. As such, your parsing may mistakenly cut off early, thinking that it is the end of the string.
Documentation
The km.buttons command is used to enable and disable the Button State Change Callback.
Sending the command with no arguments will return whether the Callback is enabled (1) or disabled (0).
Sending the command with one argument will either enable (1) the Callback, or disable (0) it.
When the callback is enabled, and a button’s state is changed, such as Left being pressed, or the Front Side button being released, the Callback will send a specific line of text on the serial port, representing the state of all keys.
Specifically, the Callback will send km.[button_states]\r\n>>> , where button_states is the raw bitmap of all button
states.
If you’re not familiar with how binary works, now might be a good time to learn.
Essentially we make a number to represent all buttons. This number is made up of 5 bits, where each bit represents a button, with the lowest being Left, and the highest being the Front Side Button.
When no buttons are pressed, the binary number is 0b00000, which is the decimal number 0, and the character '\0'
(Google/ChatGPT “escape sequence syntax” and what those characters mean if you don’t understand).
When left is pressed: binary = 0b00001, decimal = 1, character = '\1'.
When left and the rear side button are pressed: binary = 0b01001, decimal = 9, character = '\9'.
Then this character is sent in button_state’s place. So as a whole if left and rear side are pressed, the character
is '\9', and the string written to the serial port will be "km.\9\r\n>>> ".
Examples
Enabling the Callback
Input:
km.buttons(1) # Since the value is 1, the Callback is now enabled.
Output:
km.buttons(1)
>>>
Enabling, Reading, Disabling, and Reading the Callback State
Input:
km.buttons(1)   # The Callback is now enabled.
km.buttons()
km.buttons(0)   # The Callback is now disabled.
km.buttons()
Output:
km.buttons(1)
>>> km.buttons()
1                  # Since the Callback is enabled, this outputs 1.
>>> km.buttons(0)
>>> km.buttons()
0                  # Since the Callback is disabled, this outputs 0.
>>>
User Input with Callback Enabled
This example has the raw output of the serial console. The backslash prior to characters is not literally sent. If you don’t know what the backslash means in this context, use Google/ChatGPT to learn.
There are no implicit Line Terminators here.
The text in the square brackets is explaining context, and not actually sent on the serial port.
There is no Serial Input here, as the User physically pressing/releasing a button is the cause for the Output.
Output:
[User Has All Keys Released]
[User Presses Left]
km.\1\r\n          # Binary 0b00001, Left is Pressed
>>>
[User Releases Left]
km.\0\r\n          # Binary 0b00000, Nothing is Pressed
>>>
[User Presses Right]
km.\2\r\n          # Binary 0b00010, Right is Pressed
>>>
[User Presses Left]
km.\3\r\n          # Binary 0b00011, Left & Right are Pressed
>>>
[User Releases Right]
km.\1\r\n          # Binary 0b00001, Left is Pressed
>>>
[User Presses Front Side]
km.\17\r\n         # Binary 0b10001, Left & Front Side are Pressed
>>>
[User Presses Back Side]
km.\25\r\n         # Binary 0b11001, Left & Front & Back Side are Pressed
>>>
[User Releases Left]
km.\24\r\n         # Binary 0b11000, Front & Back Side are Pressed
>>>
[User Releases Front Side]
km.\8\r\n          # Binary 0b01000, Back Side is Pressed
>>>
[User Releases Back Side]
km.\0\r\n          # Binary 0b00000, Nothing is Pressed
>>>
Footnotes
This is a rather complex feature. If it were up to me, I would rewrite it to be more developer friendly. However, for compatibility’s sake, it must remain.
Eventually, when I write the new API, I’m sure this will be done in an easier way.
For now, read slow, re-read, and ask ChatGPT to summarize if you don’t understand, as it should be simple enough for it to understand very well.
Axes
There are 2 main axes used in the Keyboard Mouse API.
| Axis | Axis Directions |
|---|---|
| x | left and right |
| y | up and down |
There is a third axis used separately for the scroll wheel.
Move
The km.move([x_amount], [y_amount]) command is used to move the mouse cursor around the screen.
The integer x_amount is used to represent the number of units (typically pixels) to move right or left. A positive
value means right, and a negative value means left. Similarly, the integer y_amount controls up or down, where
negative is up, and positive is down.
As per Using a Serial Port, the whitespace after the command and before y_amount can be any
width. Both arguments must always be included. If you don’t want to move in an axis, simply send 0 in its place, as
shown in the examples below.
Units are generic, instead of being pixels. This is because of the processing the operating system can do. For example, if a user has mouse acceleration on in Windows, or has their cursor sensitivity changed, an input of 10 may result in a movement different than 10 pixels. Users typically have their device pre-configured to properly make 1 unit = 1 pixel, which is done by using default Windows settings, and disabling Mouse Acceleration.
Examples
Moving Down and Right
Input:
km.move(10, 10) # 10 units Right, 10 units Down
Output:
km.move(10, 10)
>>>
Moving Left
Input:
km.move(-5, 0) # 5 units Left
Output:
km.move(-5, 0)
>>>
Moving Up
Input:
km.move(0, -8) # 8 units Up
Output:
km.move(0, -8)
>>>
Scroll
The km.wheel([amount]) command is used to scroll the mouse wheel a number of times up or down.
When the integer amount is positive, the scroll is up. When it is negative, the scroll is down. The number doesn’t
represent pixels, but rather the number of scrolls to perform. One click in a physical scroll wheel is equivalent to one
scroll up or down.
Security
To prevent sending suspicious output, please do not use values other than -1 or +1 unless you know what you are doing. While I strongly doubt any games actually check this, I have never seen a mouse send any value other than +1 or -1 as the scroll amount, even mice with unlocking scroll wheels. Therefore, sending any larger values than this could be seen as a sign that the input is emulated and not legitimate.
Examples
Scrolling Up
Input:
km.wheel(1) # 1 for up
Output:
km.wheel(1)
>>>
Scrolling Down
Input:
km.wheel(-1) # -1 for down
Output:
km.wheel(-1)
>>>
Lock
The km.lock_[axis_lock_name] command is used to read and write the state of the lock on any axis.
By replacing axis_lock_name with one of the axis lock names defined below, it can be made to work with any axis.
Calling the command with no arguments (by using ()) will return the state of the lock on the axis.
Calling the command with one argument will set the lock’s state. If the argument is 1 it will enable it. If it is 0,
it will disable it.
When the lock is enabled, any physical movement on the axes will not be sent to the Output PC. The Input PC can still send movement to the Output PC by using the Move command.
This is also known as “input masking”, as the physical input is “masked” from the Output PC.
| Axis Lock Name | Axis Direction |
|---|---|
| mx | left and right |
| my | up and down |
Examples
Locking the X Axis
Input:
km.lock_mx(1) # Since the value is 1, the lock is now on.
Output:
km.lock_mx(1)
>>>
Locking, Reading, Unlocking, and Reading the Y Axis
Input:
km.lock_my(1)   # Any up and down input will no longer be sent to the Output PC.
km.lock_my()
km.lock_my(0)   # Up and down input will now be sent again like normal.
km.lock_my()
Output:
km.lock_my(1)
>>> km.lock_my()
1                  # Since the lock is enabled, this outputs 1.
>>> km.lock_my(0)
>>> km.lock_my()
0                  # Since the lock is disabled, this outputs 0.
>>>
Catch XY
The km.catch_xy([duration], [include_sw_input]) command is used to find the amount of x/y mouse input over the last
duration of time.
The parameter duration is a value in milliseconds up to 1000, declaring how far back in time to sum the x/y input.
The parameter include_sw_input is an optional boolean (true or false, with any capitalization), declaring whether
to include both software and hardware input (true), or purely hardware input (false, or no parameter).
The command returns the summed input in the following format: (x, y).
Examples
Summing the Last Second of Hardware Input
Input:
km.catch_xy(1000) # 1000ms = 1 second = max duration
Output:
km.catch_xy(1000)
(500, -500)        # The mouse moved 500 to the right, and 500 up in the last second.
>>>
Summing the Last 10 MilliSeconds of Software and Hardware Input
Input:
km.catch_xy(10, true) # 10ms, include software input
Output:
km.catch_xy(10, true)
(-3, 10)           # The mouse moved 3 left, and 10 up in the last 10ms.
>>>
Axis State Change Callback
Documentation
The km.axes command is used to enable and disable the Axis State Change Callback.
Sending the command with no arguments will return whether the Callback is enabled (1) or disabled (0).
Sending the command with one argument will either enable (1) the Callback, or disable (0) it.
When the callback is enabled, and input is received on an axis, such as the mouse being moved, or the mouse being scrolled, the Callback will send a specific line of text on the serial port, showing the received movement.
Specifically, the Callback will send Axes([x], [y], [scroll])\r\n>>> , where x is the horizontal movement, y is
the vertical movement, and scroll is the amount scrolled.
Positive x is to the right, while negative is to the left. Positive y is down, while negative is up. Positive
scroll is up, while negative is down.
Typically mice will only send units of 1 (1 or -1) when scrolling, as oppsoed to movement, which normally sends
potentially hundreds of units at once.
Examples
Enabling and Disabling the Callback
Input:
km.axes(1) # Since the value is 1, the Callback is now enabled.
Output:
km.axes(1)
>>>
Enabling, Reading, Disabling, and Reading the Callback State
Input:
km.axes(1)   # The Callback is now enabled.
km.axes()
km.axes(0)   # The Callback is now disabled.
km.axes()
Output:
km.axes(1)
>>> km.axes()
1                  # Since the Callback is enabled, this outputs 1.
>>> km.axes(0)
>>> km.axes()
0                  # Since the Callback is disabled, this outputs 0.
>>>
User Input with Callback Enabled
The text in the square brackets is explaining context, and not actually sent on the serial port.
There is no Serial Input here, as the User physically pressing/releasing a button is the cause for the Output.
Output:
[User Moves Right]
Axes(7, 0, 0)      # 7 units right, 0 units up, 0 scroll
>>>
[User Moves Left]
Axes(-8, 0, 0)     # 8 units left, 0 units up, 0 scroll
>>>
[User Moves Right & Down]
Axes(4, 5, 0)      # 4 units left, 5 units down, 0 scroll
>>>
[User Scrolls Up]
Axes(0, 0, 1)      # scrolls up
>>>
[User Scrolls Down]
Axes(0, 0, -1)     # scrolls down
>>>
Keyboard
This section covers all km commands that affect devices designated as Keyboards. A device’s type (Mouse or Keyboard) can be set in the Ferrum Utility on the input computer.
Keys
There are 255 keys on any keyboard being used on Microsoft Windows.
| Key Number | Key Name |
|---|---|
| 4 | A |
| 5 | B |
TODO: Add the rest of the keys. For people interested, it’s just the list of keys from the HID HUT 1.5 Document, in section 10 on the Keyboard/Keypad page, pages 89~95.
https://usb.org/sites/default/files/hut1_5.pdf
Set Key State
The km.down([key]) and km.up([key]) commands are used to set the state of any of the keyboard keys.
By replacing key with the number of any key, as defined in the Keys section, this command can be used
for all keys.
As their names suggest, down makes the key become pressed, while up makes it force release. For compatibility
reasons, these names are slightly confusing, and so be careful to not mistake down for the km.press command, as
km.press actually performs a click.
Releases last for a uniformly random time period between 125ms and 175ms. After this time period, the button returns to the physical state.
Presses are indefinite, meaning until the user engages the Hardware Override, or a release or click command is sent, the button will remain pressed.
Note: The click command will override any presses or releases in place.
Examples
Pressing the A Key
Input:
km.down(4) # 4 for A
Output:
km.down(4)
>>>
Pressing and Releasing the Left Shift Key
Input:
km.down(225)    # 225 for Left Shift
# A slight delay of is recommended here so the click appears realistic.
km.up(225)
Output:
km.down(225)
>>> km.up(225)
>>>
Click
The km.press([key]) command is used to make the keyboard press and release a key over some time. Rather unintuitively,
for compatibility’s sake, the command is called km.press, despite being responsible for a full click of a key.
By replacing key with the number of any key, as defined in the Keys section, this command can be used
for all keys.
Currently this command presses, delays, releases, delays, and then returns to the hardware state.
There is a delay for how long the press and release are held for. The press and release durations are uniformly random values between 75ms and 125ms, and 125ms and 175ms respectively. For fine control over the duration of the delays, I strongly recommend developers use the commands defined in Set Key State.
Clicks can be overridden by the user via the Hardware Override.
If the key is physically pressed when the click starts, it will be force released after the press delay, and then the release will be removed after the release delay, putting it back in the hardware state (pressed if it’s still physically pressed, or released if the user released the key at some point).
Examples
Clicking the Z Key
Input:
km.press(29) # 29 for Z
Output:
km.press(29)
>>>
Clicking the Right Control Key
Input:
km.press(228) # 228 for Right Control
Output:
km.press(228)
>>>
Multiple Key Input
The km.down, km.up, and km.press commands have variants respectively called km.multidown, km.multiup, and
km.multipress. These variants act almost identically to the originals, however they allow as many arguments as the
caller desires, where each extra argument is another key to press/release/click.
These variants allow developers to press, release, or click multiple buttons within the same frame. Keep in mind that
currently developers are expected to add their own delay between presses, and so they should expect the multi variants
of these commands to instantly send all inputs within the same frame. This behavior may be changed in the future.
Note that km.multipress uses a different random click duration for each key.
Examples
Pressing Down A, B, and C Keys All at Once
Input:
km.multidown(4, 5, 6) # 4 for A, 5 for B, 6 for C
Output:
km.multidown(4, 5, 6)
>>>
Clicking Left Shift, H, and I at the Same Time
Input:
km.multipress(225, 11, 12) # 225 for Left Shift, 11 for H, 12 for I
Output:
km.multipress(225, 11, 12)    # 225 for Left Shift, 11 for H, 12 for I
>>>
Pressing and Releasing 1, 2, and 3 for Exactly One Frame
Input:
km.multidown(30, 31, 32)    # 30 for 1, 31 for 2, 32 for 3
km.multiup(30, 31, 32)
Output:
km.multidown(30, 31, 32)
>>> km.multiup(30, 31, 32)
>>>
Lock
The km.mask([key], [state]) command is used to read and write the state of the lock/mask on any keyboard key.
By replacing key with the number of any key, as defined in the Keys section, this command can be used
for all keys.
Calling the command with state set to 0 will disable the lock, while 1 will enable it.
Calling the command with no second argument will return the state of the lock on the key.
When the lock is enabled, any physical key presses will not be sent to the Output PC. The Input PC can still read the key states via the Get Button State command. The Input PC can also still press/release the key via either the Click or Press/Release commands.
This is also known as “input masking”, as the physical input is “masked” from the Output PC.
Examples
Locking the W Key
Input:
km.mask(26, 1) # Since the value is 1, the lock is now on.
Output:
km.mask(26, 1)
>>>
Locking, Reading, Unlocking, and Reading the Space Key
Input:
km.mask(44, 1)   # The space bar will no longer function on the Output PC.
km.mask(44)
km.mask(44, 0)   # The space bar will now work again on the Output PC.
km.mask(44)
Output:
km.mask(44, 1)
>>> km.mask(44)
1                  # Since the lock is enabled, this outputs 1.
>>> km.mask(44, 0)
>>> km.mask(44)
0                  # Since the lock is disabled, this outputs 0.
>>>
Get Key State
The km.isdown([key]) command is used to read the state of any of the keyboard keys.
By replacing key with the number of any key, as defined in the Keys section, this command can be used
for all keys.
Examples
Reading the A Key’s State
Input:
km.isdown(4)
Output:
km.isdown(4)
1            # The A Key in this case was pressed (1).
>>>
Reading the Left Control Key’s State
Input:
km.isdown(224)
Output:
km.isdown(224)
0            # The Left Control Key in this case was released (0).
>>>
Clear Locks
The km.init() command is used to clear all keyboard locks/masks. It is called to make it easy to return to a known
state.
Examples
Clearing all Locks
Input:
km.init()
Output:
km.init()
>>>
Key State Change Callback
The km.keys command is used to enable and disable to the Key State Change Callback.
Sending the command with no arguments will return whether the Callback is enabled (1) or disabled (0).
Sending the command with one argument will either enable (1) the Callback, or disable (0) it.
When the callback is enabled, and a keyboard key’s state is changed, such as A being pressed, or Left Shift being released, the Callback will send a specific line of text on the serial port, representing the state of all keys.
Specifically, the Callback will send Keys([keys])\r\n>>> , where keys is the comma delimited list of decimal key
codes, sorted by increasing decimal value. See Keys for information on which key codes represent which
keys.
Examples
Enabling the Callback
Input:
km.keys(1) # Since the value is 1, the Callback is now enabled.
Output:
km.keys(1)
>>>
Enabling, Reading, Disabling, and Reading the Callback State
Input:
km.keys(1)   # The Callback is now enabled.
km.keys()
km.keys(0)   # The Callback is now disabled.
km.keys()
Output:
km.keys(1)
>>> km.keys()
1                  # Since the Callback is enabled, this outputs 1.
>>> km.keys(0)
>>> km.keys()
0                  # Since the Callback is disabled, this outputs 0.
>>>
When the User Presses and Releases Keys, and Callback is Enabled
The text in the square brackets is explaining context, and not actually sent on the serial port.
There is no Input here, as the User physically pressing/releasing a key is the cause for the Output.
Note as stated above that when multiple keys are currently pressed, they are put in the list in increasing decimal order, not in the order they were pressed.
Output:
[User Has All Keys Released]
[User Presses A]
Keys(4)            # A = 4 is pressed
>>>
[User Releases A]
Keys()             # No keys are pressed
>>>
[User Presses K]
Keys(14)           # K = 14 is pressed
>>>
[User Presses C]
Keys(6, 14)        # C = 6, and K = 14 are pressed
>>>
[User Releases K]
Keys(6)            # C = 6 is pressed
>>>
[User Presses Left Shift]
Keys(6, 225)       # C = 6, and Left Shift = 225 are pressed
>>>
[User Presses Backspace]
Keys(6, 42, 225)   # C = 6, Backspace = 42, and Left Shift = 225 are pressed
>>>
[User Releases C]
Keys(42, 225)      # Backspace = 42, and Left Shift = 225 are pressed
>>>
[User Releases Left Shift]
Keys(42)           # Backspace = 42 is pressed
>>>
[User Releases Backspace]
Keys()             # No keys are pressed
>>>
Aliases
This file contains all aliases. Sending the alias typically has the same behavior as sending the original command.
| Alias | Original | Details |
|---|---|---|
| m | km.move | Added for Blurred. |
Examples
Using the m Alias
Input:
m(5, 10) # This is equivalent to km.move(5, 10)
Output:
m(5, 10)
>>>
KMBox Net Style API
For future projects, use of the KMBox Net API is STRONGLY discouraged. This API is not very well made, and overall not fun to work with. I suggest using the DHZBox Style API, or the standard Keyboard and Mouse API instead, as they are much more clear, easier to work with, and easier to add features to.
Ferrum’s Software API supports KMBox Net Style commands via the UDP Socket. Simply connect via the details listed in the
Net API tab in the Ferrum App, and send KMBox Net commands as defined in their documentation:
https://github.com/kvmaibox/kmboxnet. Note that not all commands are supported, but most of the essential ones
are.
DHZBox Style API
Ferrum’s Software API supports DHZBox Style commands via the UDP Socket. Simply connect via the details listed in the
Net API tab in the Ferrum App, and send dhzbox commands as defined in their documentation:
https://docs.qq.com/doc/DT0xnTVpRenBhT2pQ. Note that not all commands are supported, but most of the essential ones
are.
Legacy API
The Legacy API is an extremely basic set of KM-style Mouse commands used to control Ferrum’s functionality from platforms that don’t support the APIs provided by the Ferrum App.
For the latest features avoid using the Legacy API unless absolutely necessary. The only time it should be used is if the user uses Linux for their input pc.
To connect to the Legacy API, please connect directly to the “Silicon Labs CP210x” COM port on your input pc. The starting port speed is 115200. This speed will reset to 115200 every time the device re-powers.
The following sections provide information and pseudocode examples for the different commands available.
Misc
This contains all miscellaneous command definitions.
Version
The km.version() command in the Legacy API strictly returns kmbox: 2.0.0 Aug 31 2020 21:49:51, matching older KMBox
devices. This is for compatibility with legacy software, which may not be updated to work with newer devices.
Examples
Fetching the Device Version
Input:
km.version()
Output:
km.version()
kmbox: 2.0.0 Aug 31 2020 21:49:51
>>>
Baud
The km.baud([baud_rate]) command in the Legacy API lets developers adjust Ferrum’s hardware baud rate directly. This
command is not available in the Software API due to it using a Virtual API, which means
commands are optimized before being sent to the Ferrum hardware, and always communicated at 3,000,000 baud.
Developers are strongly recommended to not exceed 3Mbd (3000000 baud) with the Ferrum hardware. Data transfer may not be
stable at these speeds, leading to command corruption. Furthermore, 3Mbd is more than fast enough for anything, taking
just 0.050ms to send km.move(100, 100)\r\n. The default speed is 115200 baud, as explained in
Legacy API.
This function has no read feature. In other words, km.baud() does nothing, where other commands such as km.left()
would have returned the state of the button. If you’re able to communicate with the device, then the speed is your
current speed.
Examples
Setting the Baud Rate to Max
Input:
km.baud(3000000)
Output: (None)
Setting the Baud Rate to Default
Input:
km.baud(115200)
Output: (None)
Mouse
This section covers all Legacy Mouse commands.
Buttons
There are 5 buttons on any mouse being used on Microsoft Windows.
| Button Name | Button Description |
|---|---|
| left | the left button |
| right | the right button |
| middle | the scroll wheel button |
| side1 | the rear side button |
| side2 | the front side button |
Set Button State
The Legacy API implementation of this command is identical to the Software API implementation, only command echoing is disabled.
Click
The Legacy API implementation of this command is identical to the Software API implementation, only command echoing is disabled.
Lock
The Legacy API implementation of this command is identical to the Software API implementation, only command echoing is disabled.
Get Button State
The Legacy API implementation of this command is identical to the Software API implementation, only command echoing is disabled.
Button State Change Callback
The Legacy API implementation of this command is identical to the Software API implementation, only command echoing is disabled.
Axes
There are 2 main axes used by the Legacy API.
| Axis | Axis Directions |
|---|---|
| x | left and right |
| y | up and down |
There is a third axis used separately for the scroll wheel.
Move
The Legacy API implementation of this command is identical to the Software API implementation, only command echoing is disabled.
Scroll
The Legacy API implementation of this command is identical to the Software API implementation, only command echoing is disabled.
Lock
The Legacy API implementation of this command is identical to the Software API implementation, only command echoing is disabled.
Credits and Contact
This documentation was written by GameGuy.
The Ferrum Discord can typically be found at discord.gg/Ferrum.
You can find me on Discord under the handle gameguythrowaway, or the id <@515708480661749770>.
I am on Telegram at @GameGuyThrowaway.
Feel free to reach out if you see any mistakes, or if you have any questions about Ferrum or its APIs (anti cheat developers welcome).